Small Technology Foundation Personal Web Prototype-01: a mobile personal web server
Small Technology Foundation Personal Web Prototype-01: an always-connected portable personal web server that fits in your pocket.
Imagine holding your personal web site in the palm of your hand. Imagine carrying the digital aspects of your self in your pocket instead of having them on some abstract cloud under the watchful eye of some faceless multinational corporation1.
Personal Web Prototype-01 from Small Technology Foundation R&D achieves the former using widely available off-the-shelf parts and Site.js. Hopefully, it will also start you thinking in a similar vein about building things that enable the latter.
In this post, I will outline what Prototype-01 is and how you can build a similar personal web device yourself. The audience for this post is tinkerers and developers2.
The hardware

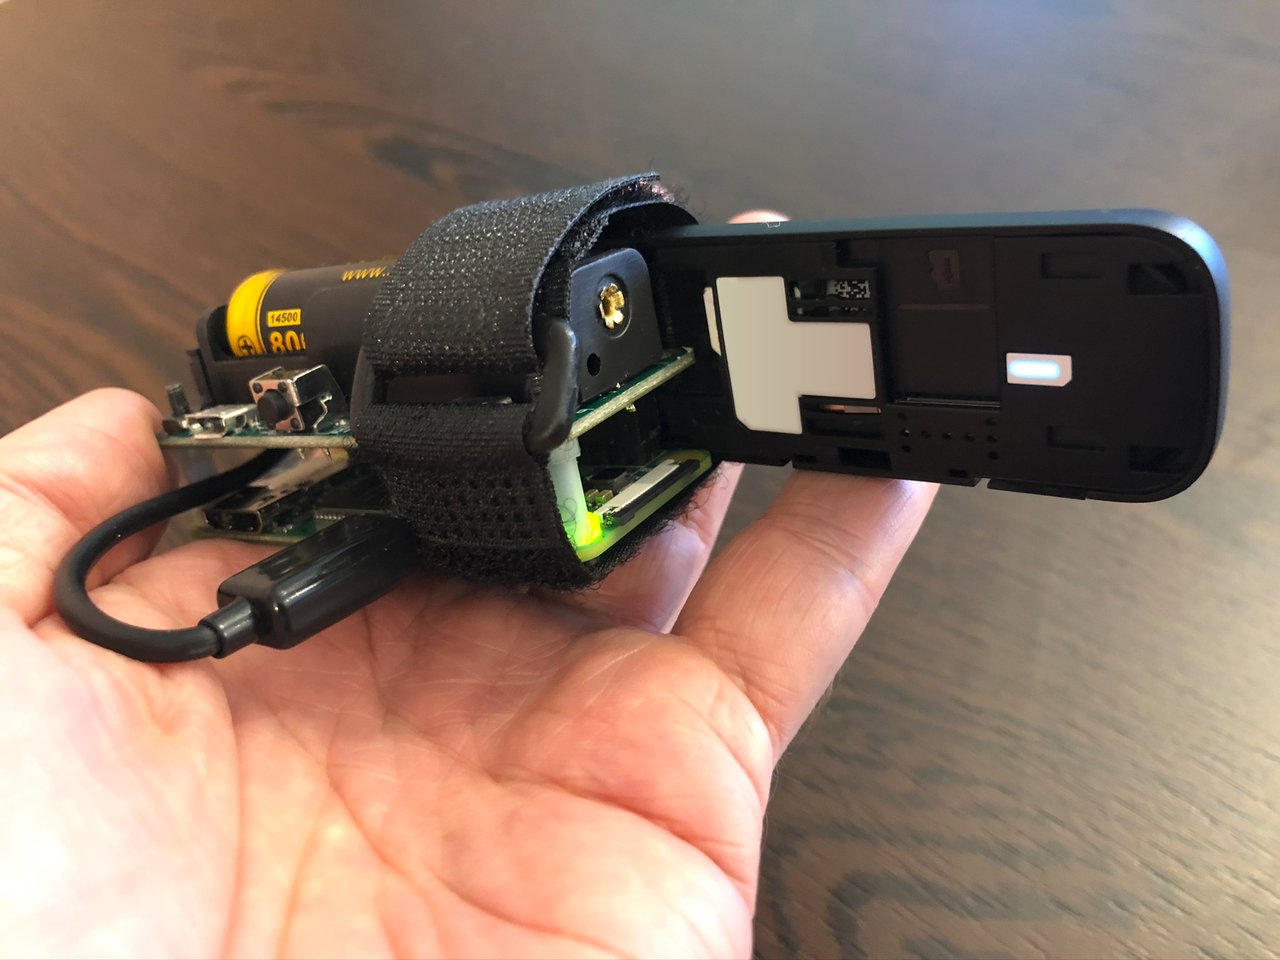
Prototype 01: the hardware.
Here are the parts I used to build Prototype-01, as labelled in the first photo, above. The main ones are in boldface.
- USB Micro Type-B (male) to USB Type-A (female) cable
- 14500 Lithium-ion battery (3.7v; rechargeable)
- Piz-UpTime (the battery/UPS board)3
- Raspberry Pi Zero W (with 32GB NOOBS SD-Card and solderless GPIO hammer header)4
- Huawei E3372 LTE USB stick with mobile data SIM card5
- Velcro strap (for attaching the LTE USB stick to the rest of it)6
In addition, you will need a domain name (I use and can recommend IWantMyName.com for mine) and you will need to know how to update your DNS settings for it.
To point your domain name to your device’s ever-changing IP address you will also need to use a service such as Ngrok (which is what I use here) or a dynamic DNS solution of some sort (which will likely need further setup)7.
Finally, to initially set up the Pi, you will also need a keyboard, mouse, and display to connect to it8.
Building it
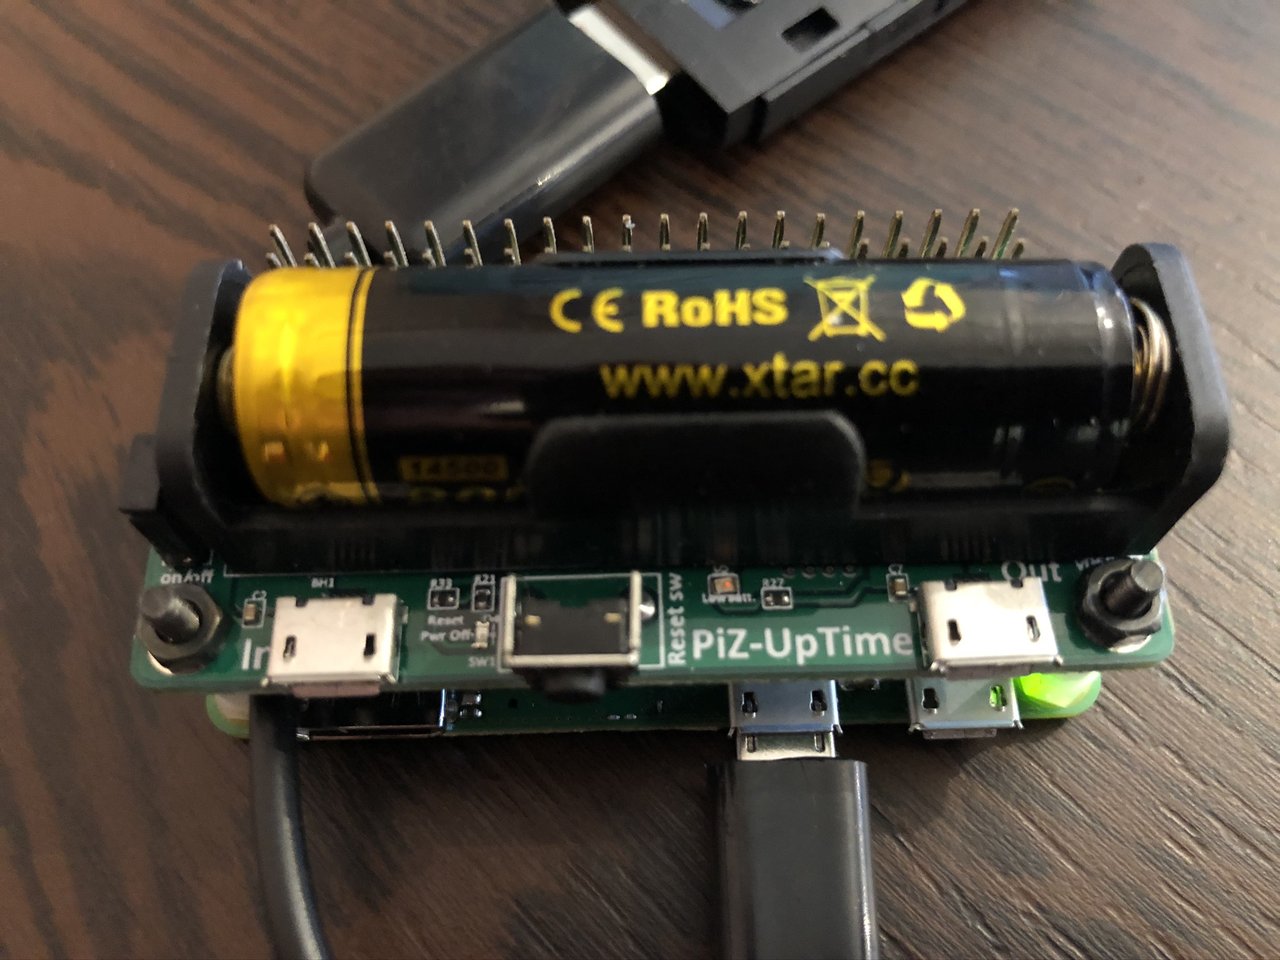
Small Technology Foundation Personal Web Prototype-01: plug-and-play (at least on the hardware side).
This is the simplest step. Simply snap the Piz-UpTime with the 14500 battery to the Raspberry Pi Zero using the GPIO header3 and connect the LTE USB stick to the USB port on the Raspberry Pi4. Ensure that you use the power port on the PiZ-UpTime and not the one on the Pi itself to charge the battery and power the unit when connected.
Preparing the Pi Zero
To prepare your Pi to use as a headless web server, connect a keyboard, mouse, and screen to it. With the NOOBS SD-Card inserted, turn on your Pi. Once it boots, open up a terminal window and carry out the following steps.
Set up SSH access with public-key authentication
-
On the Raspberry Pi, select Preferences → Raspberry Pi Configuration from the Raspberry menu.
-
In the settings box that appears, set the
subdomain.your.domainname you will serve your site from in the Hostname field. -
In the Interfaces tab, select the Enable radio button next for the SSH field.
-
Click OK to save your settings and exit settings.
-
sshinto your Pi using the IP address of the Pi (which you can find by runningifconfig) and your Pi account name and password. -
Add your SSH public key from your main computer (e.g., from
~/.ssh/id_ed25519.pub) to your Pi (e.g., into the~/.ssh/authorized_keysfile).If you do not have SSH keys generated on your main computer yet, follow the instructions here to create a pair.
-
Log out of your
sshsession and reconnect without using your password to test that the public-key authentication you just set up works.
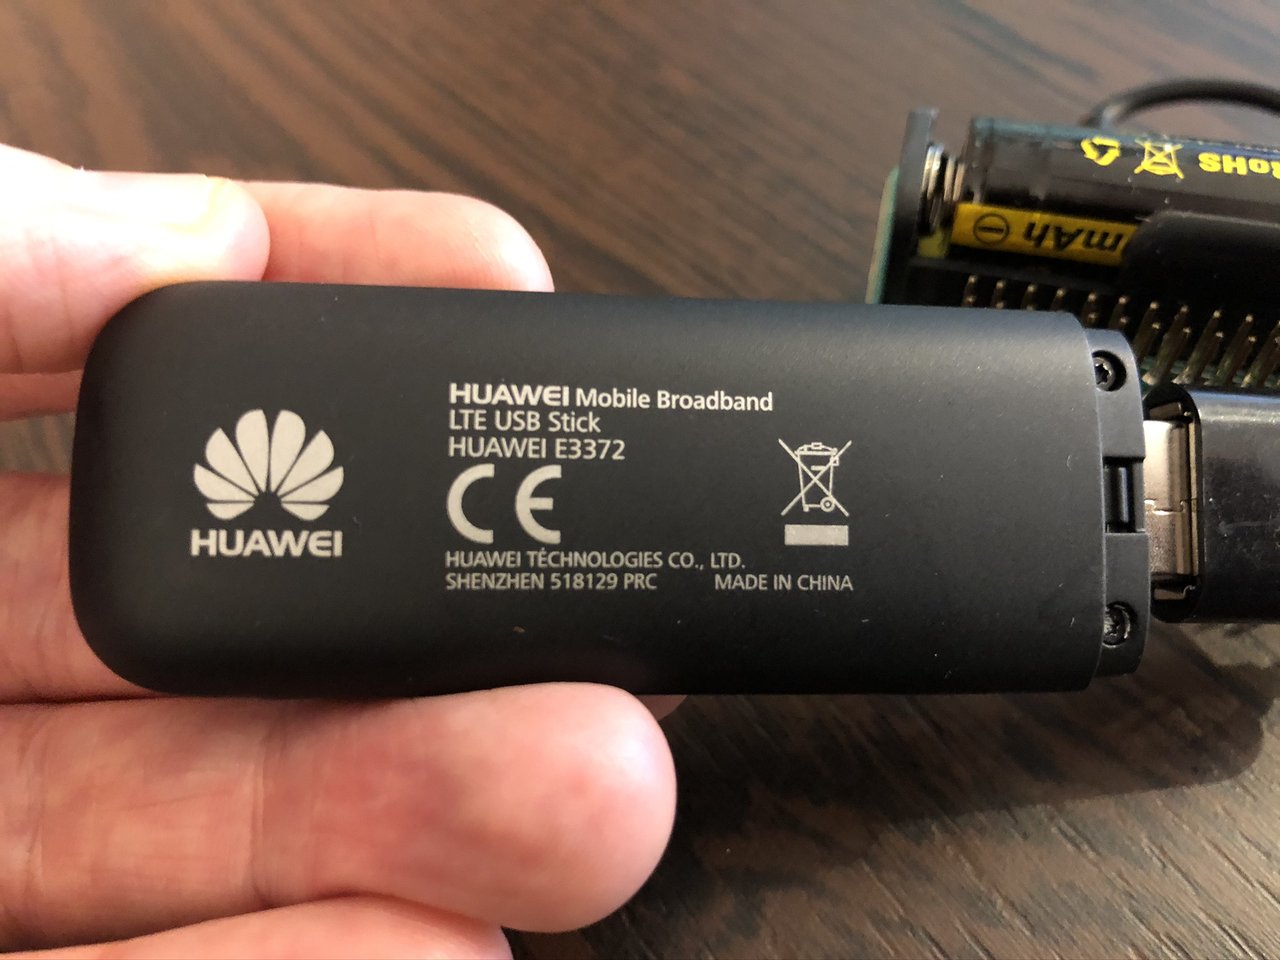
Small Technology Foundation Personal Web Prototype-01: close-up of the LTE USB Stick.
Set up ngrok
You need to configure ngrok to create three secure tunnels to the Raspberry Pi:
-
HTTP tunnel for port 80 so Site.js can handle Let’s Encrypt challenges using the HTTP-01 challenge method.
-
TLS tunnel for port 443 that Site.js will use to serve your web site on.
-
TCP tunnel for port 22 so you can access your Pi at your domain name over SSH.
To do this, create a file called ngrok.yml in the ~/.ngrok2 directory (create the directory if it doesn’t already exist):
mkdir -p ~/.ngrok2
touch ~/.ngrok2/ngrok.yml
Then add the following configuration, customising it for your needs:
authtoken: <your-auth-token>
region: eu
tunnels:
  insecure-web:
    addr: 80
    proto: http
    hostname: <your-reserved-subdomain.your.domain>
    bind-tls: false
  secure-web:
    addr: 443
    proto: tls
    hostname: <your-reserved-subdomain.your.domain>
  ssh:
    addr: 22
    proto: tcp
    remote_addr: <your-reserved-tcp-address>
You can find your authtoken on your ngrok Auth page.
To learn how to reserve a custom domain, see the ngrok documentation for tunnels on custom domains and TCP Tunnels: listening on a reserved remote address. Also, alter the region to match the one you reserved your ngrok domains on.
Once you’ve customised and saved your ngrok configuration file, you can create your tunnels at any time using:
ngrok start --all
However, while that’s good for testing, what we want is for ngrok to start automatically when the Raspberry Pi does. This will allow us to SSH into the Pi so we can use it headlessly from now on and it will mean that once it has power, our web site will be reachable from anywhere in the world.
To do this, edit the /etc/xdg/lxsession/LXDE-pi/autostart file, add the following line to it, and save it:
@ngrok start --all
This will automatically run your ngrok tunnels in the background whenever the Pi boots up.
Install Site.js and run it as a startup daemon
- Install Site.js
wget -qO- https://sitejs.org/install | bash
- Create a basic web site:
# Create a folder to hold the web site.
mkdir -p ~/public

# Switch to that folder.
cd public

# Create a simple “Hello, world!” page.
echo 'Hello, world!' > index.html
- Create a startup daemon using Site.js to serve your site (this will survive restarts and crashes, etc.):
site enable
Testing it
You should now be able to hit https://subdomain.your.domain and see your “Hello, world!” page.
Updating your site
Now that your site is live, how do you make it a bit more exciting?
-
On your main computer, create a more interesting web site than “Hello, world”.
If you want to get an idea for the types of things you can build with Site.js, see the tutorial I wrote recently on how to build a simple chat app with Site.js.
-
Make sure Site.js is also installed on your main computer and then issue the following command:
site --sync-to=subdomain.your.domain --exit-on-sync -
Hit
https://subdomain.your.domainagain and you should see your new site.
To learn more about Site.js, read the Site.js documentation.
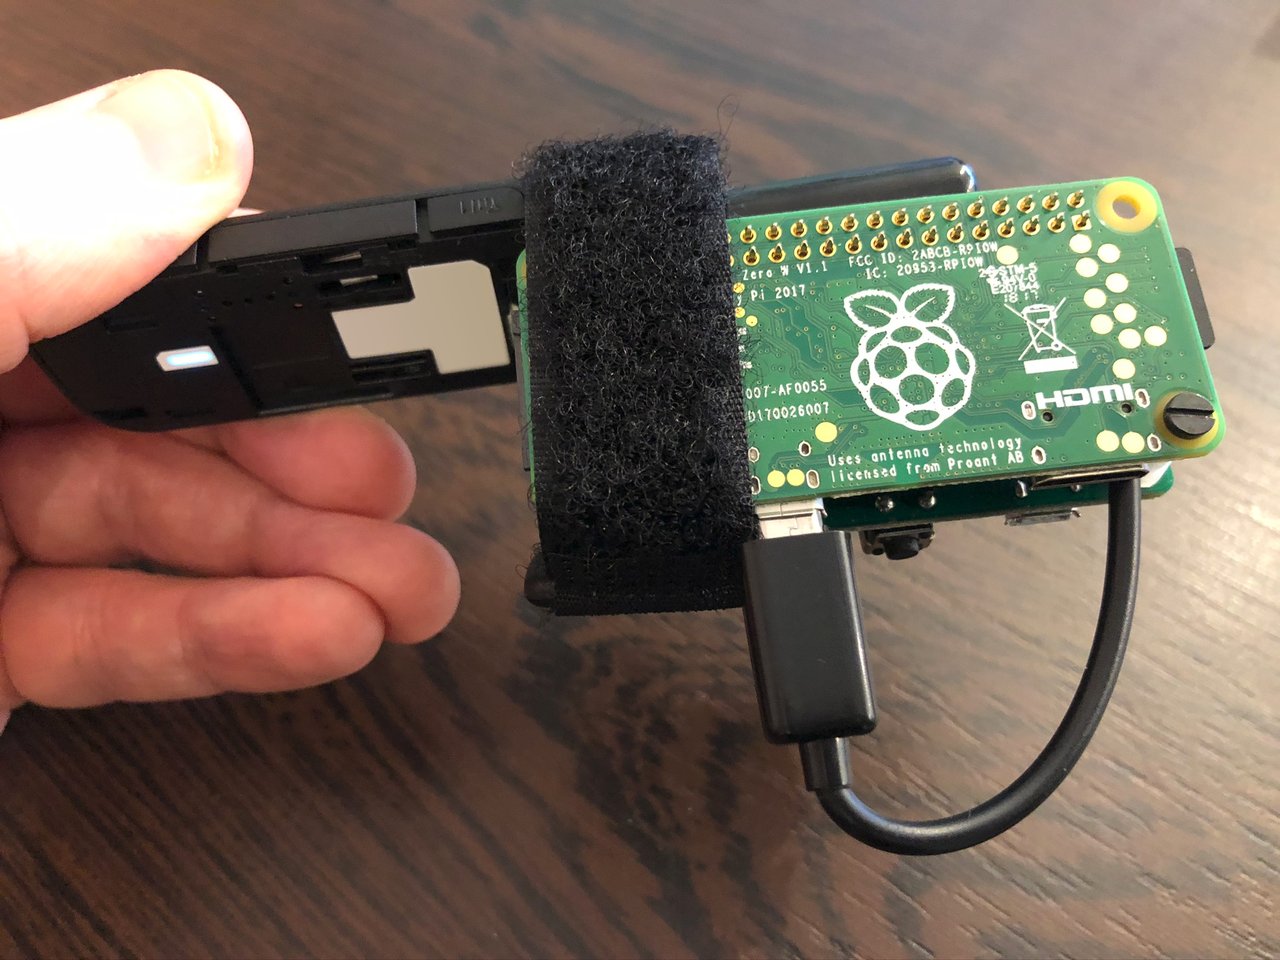
Small Technology Foundation Personal Web Prototype-01: all together now.
What next?
This is just the first prototype to come out of our work on Site.js as part of our research and development work at Small Technology Foundation. It doesn’t represent a specific product we are thinking of building but rather more the direction in which we’re thinking in general (which might result in products later on).
I hope, though, that it does help demonstrate two important points:
-
We all already carry much more powerful and refined versions of this prototype in our pockets (it’s your smart phone) and yet we cannot run our own web sites on them.
Why not?
Because the Big Tech corporations that make these devices don’t want us to.
I hope this gives folks like Purism and e.foundation some ideas about what they could do in this area to differentiate themselves from the likes of Apple, etc.
-
If we want the sort of freedom devices like this can offer people, we must ensure that they just work out of the box.
While I hope that you have found this post interesting if you’re a tinkerer or developer, I also hope that it highlights the mountain of work that must be done if we want all the various aspects outlined here to work seamlessly when our audience is everyday people who use technology as everyday things.
I hope this post has inspired to you think about what you can make that everyday people can use to take ownership and control of the digital and connected aspects of their lives.
As always, please feel free to let me know your thoughts.
Like this? Fund us!
Small Technology Foundation is a tiny, independent not-for-profit.
We exist in part thanks to patronage by people like you. If you share our vision and want to support our work, please become a patron or donate to us today and help us continue to exist.
-
Each one of us has the raw technology to achieve this in our pockets in the form of a smartphone but the smartphone manufacturers do not let us do this because they do not want us to have ownership and control the digital and connected aspects of our lives – they want to be able to filter our experiences, gatekeep our access, and manipulate our behaviour for profit. ↩︎
-
If we want simple everyday technology for everyday people to use, we must first empower those who make such things with the tools they need to do so without being beholden to the tools of Big Tech. To paraphrase Audre Lorde: the master’s tools will never dismantle the master’s house and neither will the master’s tools ever let you build your own house. ↩︎
-
There are several UPS / battery solutions for the Raspberry Pi Zero. The one I’m using here is the PiZ-UpTime 1.0. The latest, currently available version is the PiZ-UpTime 2.0).
Other power options include the PiSugar – which I’d love to get my hands on and the JuiceBox Zero.
If you do end up using the PiZ-Uptime, you will want to install a cron job to ensure that the board is cleanly shut down if the battery runs low on power. ↩︎
-
I’m using a Raspberry Pi W which doesn’t come with a GPIO header. You don’t need the GPIO header to connect the UPS (you can also use a USB Micro-B male-to-male cable/connector). If you do want to use the header, either get the Raspberry Pi WH model (which comes with it pre-soldered) or you can do what I did, which was to use a solderless GPIO hammer header from Pimoroni. ↩︎
-
If the LTE USB stick is not automatically recognised, see this. Also, make sure you put the SIM card in to the SIM card slot and not the SD-Card slot on the LTE USB stick. They’re easy to confuse. ↩︎
-
A wad of blue/white tack or a strong rubber band works just as well; just use whatever you have lying around. ↩︎
-
In this post, I will only cover Ngrok, with an Ngrok Pro account which is necessary for using custom domain names. ↩︎
-
Since the Pi Zero only has one USB port, you will either need a bluetooth keyboard/mouse or a combination USB keyboard/mouse or a USB hub.
If you don’t want to keep connecting a keyboard and mouse, look at Synergy. It enables you to share one keyboard and mouse across several devices. If you want a free and open source version, check out Barrier (which I learned about only later and haven’t tried myself yet).
↩︎