
Turn up the heat in Flash with Arduino
I just got back from a lovely FlashBrighton evening full of Arduino hacking and Wiimote fun.
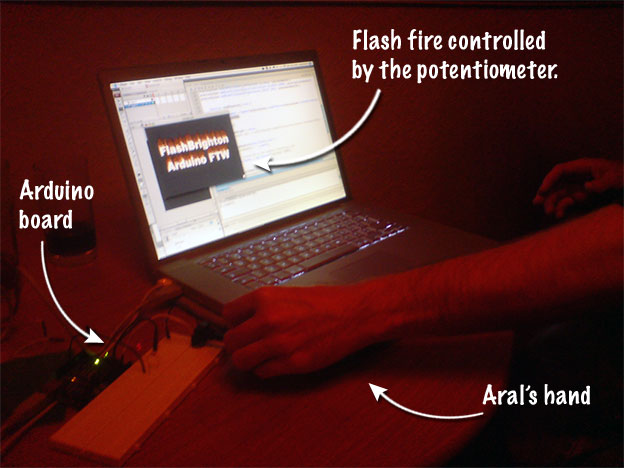
Arduino is an open-source board that connects to your computer via USB. Add a breadboard, some LEDs, and other components and you can create all sorts of lovely things with it. You program it using the Arduino scripting environment which is based on (and almost identical to) Processing.
I can't wait for my own board and workshop kit to arrive tomorrow. You can order them in the UK from Tinker.it (which is where I ordered mine from).
So, back to tonight's FlashBrighton meet-up.
The evening kicked off with a presentation on the Wiimote and Flash by Kyle Jennings from Berkeley. We heard about how he used the Wiimote and Flash to create a virtual knitting application for Rachel Beth Egenhoefer who has an exbition at Lighthouse Brighton on the 27th of March.
Following Kyle's talk, the group split into two, with Seb presenting an introduction to the Arduino board and those of us with prior knowledge of the board (I'd sat through the introduction at BarcampBrighton2) forming break-out groups to try new things.
Paul and I got together and decided to make our Arduino board talk to Flash. The idea was that we would turn the knob on a potentiometer on the Arduino board to adjust the height of virtual flames in Flash.
Here's how we made the Arduino and Flash talk:
- In the setup() method of your Arduino application, set up the serial port:
Serial.begin(9600);. 9600 is the baud rate we used. - In the loop() method, read the the analog value from the potentiometer and print it out to the Serial port:
Serial.println(knobValue); - Download a serial proxy (we used serproxy, which you can download from the Arduino homepage) to proxy the values received on the serial port to a socket connection.
- Configure the serial proxy. For serproxy, we edited the serproxy.cfg file to add a reference to the USB port we had the Arduino connected on (you can get this information from Tools → Serial Port in the Arduino application, for us it was
serial_device1=/dev/tty.usbserial-A60049Co). We also set the port's baud settings to 9600 in the config file (comm_baud=9600). - Run serproxy. On my Mac, I chose Open With → Terminal on serproxy. You should see serproxy's welcome message:
Serproxy - (C)1999 Stefano Busti, (C)2005 David A. Mellis - Waiting for clients - Finally, we made a binary socket connection in Flash to the port that serproxy was running on (5331).
To make sure that the socket is working correctly, you can quickly download and run the Flashduino Flash demo by Brett Forsyth (just make sure you change the port in the code as that one's made for TinkerProxy, not serproxy).
Here's the Arduino code:
// Potentiometer to flash
int ledPin = 9;                // LED connected to pin 9
int knobPin = 0;               // Potentiometer connected to Analog pin 0

void setup()                    // run once, when the sketch starts
{
  pinMode(ledPin, OUTPUT);      // sets the digital pin as output

  Serial.begin(9600);
}

void loop()                     // run over and over again
{
  // Get the value of the potentiometer
  int knobValue = analogRead(knobPin);

  // Write the value to the serial port
  Serial.println(knobValue);

  // Write out the value to a LED on the board too
  // so we know the knob's working.
  analogWrite(ledPin, knobValue/4);

  delay(50);
}
And the Flash code (there's an instance of Grant's Fire component on stage called fireFX):
// Arduino controlled Flash fire.
// FlashBrighton hack by Paul Booth and Aral Balkan
import flash.errors.*;
import flash.events.*;
import flash.net.Socket;

var arduinoSocket:Socket;

init();

function init()
{
  initFire();
  openArduinoSocket();
}

function initFire()
{
  var params:Array = ["distortion","distortionScale","fadeRate","flameHeight","flameSpread","smoke"]

  var l:uint = params.length;
  for (var i:uint=0; i<l; i++)
  {
    fireFX[params[i]] = 0.35;
  }
}

function openArduinoSocket()
{
  //Create a socket connection to serproxy
  arduinoSocket = new Socket("localhost",5331);
  arduinoSocket.addEventListener(Event.CLOSE, closeHandler);
  arduinoSocket.addEventListener(ProgressEvent.SOCKET_DATA, socketDataHandler);
}

function closeHandler(event:Event):void
{
  // For some reason, the socket gets closed sometimes, re-open it.
  trace("[Workaround] Socket closed, reopening...");
  openArduinoSocket();
}

function socketDataHandler(event:ProgressEvent):void
{
  // Get the value from the potentiometer (0-1024) and
  // normalize it to (0-2) range for the fire component.
  var value:Number = Number(arduinoSocket.readUTFBytes(arduinoSocket.bytesAvailable));
  value = value/512;

  // fireFX is the instance name of Grant's fire component on stage.
  fireFX.flameHeight = value;
}
Finally, here is the full settings file we used for serproxy (serproxy.cfg). The lines we added are marked with ***:
# Config file for serproxy
# See serproxy's README file for documentation

# Transform newlines coming from the serial port into nils
# true (e.g. if using Flash) or false
newlines_to_nils=true

# *** The USB port that the Arduino is connected to ***
serial_device1=/dev/tty.usbserial-A60049Co

# Comm ports used
comm_ports=1,2,3,4

# *** Set the baud rate ***
comm_baud=9600

# Default settings
comm_databits=8
comm_stopbits=1
comm_parity=none

# Idle time out in seconds
timeout=300

# Port 1 settings (ttyS0)
net_port1=5331

# Port 2 settings (ttyS1)
net_port2=5332

# Port 3 settings (ttyS2)
net_port3=5333

# Port 4 settings (ttyS3)
net_port4=5334
A big thank-you to everyone who lent us stuff to play with (Jo, Matt, Jamie, Mark), to Kyle for his presentation, and to Seb and the FlashBrighton crew for organizing yet another wonderful meet-up.
Comments
by Brett Forsyth on 2008-03-19 00:43:26
by Aral on 2008-03-19 14:00:22
by Alvin on 2008-03-20 04:41:58
by links for 2008-03-20 at adoption curve dot net on 2008-03-20 00:35:09
by Aral on 2008-03-20 16:29:57
by Aral on 2008-03-22 20:23:31
by iestyn on 2008-03-22 16:39:53
by Aral on 2008-03-23 11:37:38
by Jonathan Ross on 2008-05-23 06:03:31
by Aral on 2008-03-24 13:16:01
by j4mie on 2008-03-19 18:30:29
by Aral on 2008-03-19 10:20:56
by Alex on 2008-04-03 11:20:45
by zenbullets on 2008-03-19 11:22:25
by Getting started with Django at Aral Balkan on 2008-03-21 00:00:26
by iestyn on 2008-03-23 12:59:42
by Owen Bennett on 2008-03-23 13:32:27
by Brett Forsyth on 2008-03-23 15:38:34
by iestyn on 2008-03-22 22:36:00
by farz on 2008-09-07 19:52:46
by woodnotoil on 2009-01-23 03:00:17
by Thomas on 2010-01-27 21:42:12
by noa on 2010-07-05 16:32:25
by schabernack on 2010-07-09 13:48:04